By Dave Shorter
This article first appeared in Keep Soaring - LKSC and is reproduced with their kind permission.
It’s a well established phenomenon that if you throw a feather, it won’t go far, but throw a rock with the same force and see how far it goes. And so it is with gliders. An empty glider is a bit like the feather – fill the wings up with water and it goes like a rock. Conversely, try dropping the feather and the rock together. Which one falls quickest? Similarly with gliders – the sink rate of the heavy glider is significantly greater.
The extract on the following page from the website aviation.stackexchange.com gives a very clear explanation of the benefits of ballast. So, how much water? Under what conditions do you benefit? And what gain in speed do you achieve?
Putting Water into your Glider
Read your manual first. Make sure you balance the wing tanks with the appropriate amount of water in the tail tank. The wing tanks are normally ahead of the CofG of the glider and need to be balanced by water in the tail.
In the JS1, you need 1 litre of disposable water in the tank for every 25 litres in the wings. Your glider’s flight manual is the guide. Never put hose pressure into the wings – many very nice glider wings have been split open this way. If you’re pressure filling, you should have a maximum of around 1 metre of head with your filling system. An overflow pipe in the water filling system a metre above the wing surface will achieve this.
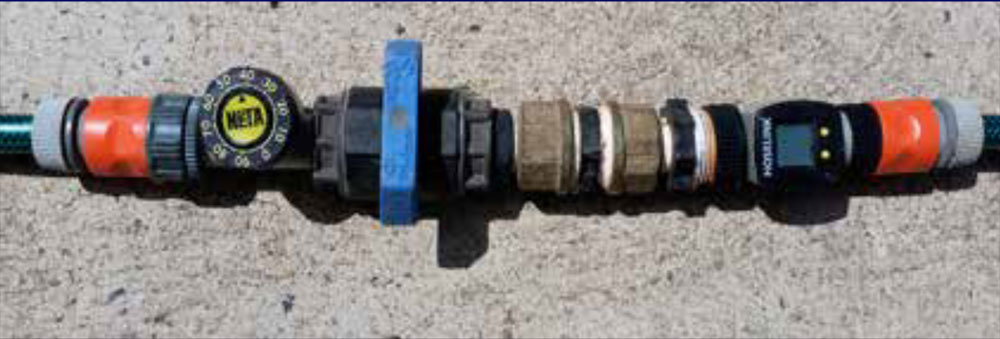
If you’re not filling the tanks completely full, you’ll need to measure the amount you put in. Pouring water into the wing with a 20 litre bucket and funnel is a bit fatiguing. Cheap digital water flow meters are available – see hoselink.com.au, au.wellindal.com/garden/gardena/p-2907 or google ‘water flow meter’.
I’ve had some variable results with meters giving misleading results, particularly if the flow rate is too low, or batteries going down. I currently have two cheap meters in line, both reading as a check against each other (see picture). I also have a calibrated 10 litre bucket that I use to check that they are reading accurately. (I think the Neta flow meter may possibly be no longer available.) After filling is completed, don’t forget to check that all dump valves are working – including your tail tank.
Towing a glider with water can be tricky – particularly traversing sloping ground. If the wing walker is on the uphill side, water may run downhill in the lower wing, resulting in that wing scraping along the ground. The wing walker may be insufficiently heavy to keep the wing down, so add a weight such as a couple of old bottles of water to keep the wing from lifting. Keep a careful eye out the rear when towing, to ensure you don’t travel the length of the field dragging one wing on the ground and risk wrecking an aileron on a tuft of grass.
Many gliders need to stay level to prevent loss of water from a wing on the ground. So, pre-launch, you will need to prop the wings. Adjustable aluminium extension poles for painting, available from Bunnings paint shop, work well. If the ground is uneven you can adjust the support height each side to ensure your wings are level.
CAUTION – using small diameter broomsticks, or dowel poles to prop the wings can dimple the underside of the wing surface. Ensure that the bearing surface on top of the pole has something to spread the load and, if possible, position the wing support directly under a rib. If you don’t have sticks, just keep the wing walker on until launch, and persuade your friendly wing-man to manage the wing walker after you’ve launched.
Launching with Water
If it’s your first flight with water, don’t be concerned. Some people advise you to try your first flight with half water, but you’ll find the glider quite manageable full of water. It feels more solid, doesn’t get bounced around as much, and the glider is just as easy to handle full as empty, provided you fly a bit faster.
It is important to ensure your wing-man balances the wings before the tuggie starts to roll. If the wings are not balanced, when the wing-man lets go you’ll have a lot of trouble holding that heavy wing up until you get full aileron control. Conversely, if the wing-man gets your wings properly balanced before you roll, the inertia in your wings keeps the wings much more stable than an empty glider, and the launch is much easier to control.
You’ll need to aerotow at a higher speed. A fully ballasted 18m glider gets quite ‘mushy’ and uncomfortable aerotowing at 60kts, and this can be quite dangerous. If you’re heavy, make sure the tuggie knows, and request a 70kt tow. If you’re not getting that speed on tow out, quickly request ‘plus 5/10 knots’ (don’t ask for 70 knots – he may already think he’s flying at that speed, or his ASI may be over-reading – always say ‘plus’ whatever you need.)
Aerotow with high take-off weight requires a powerful tow plane. Many tow planes are not certified to tow gliders with high take-off weights. Reduce the take-off weight if necessary! But what about winch launching with ballast?
A fully ballasted single seat glider's all-up-weight won’t be too different to that of a two-seater trainer, so a winch with enough power to launch training gliders should be able to handle a ballasted single seater. But stall speed is appreciably higher and minimum airspeed needs to be adjusted up (GFA guidance 1.3xVs min.) The JS1 manual specifies min/max speeds for 600kg AUW of 62/81 knots.
Self-launching with Ballast
Modern self-launchers can carry about one and a half times the pilot’s weight in water. This means that the glider is going to take a lot longer to lift off... on a typical Keepit day, about 50% longer. On a hot day, even further than that. Check the flight manual for information on flap position. On gliders that are happy to take off with positive flaps, it may be recommended to use 0º or negative flaps on the initial part of the take-off roll and move to positive flaps when you have aileron control authority.
Flying with Water Ballast
This is the fun part. As a rule of thumb you can expect to achieve another 10% in XC speed on a reasonable day. You should be cruising around 10 knots faster between thermals, and you’ll need to fly faster when thermalling. Your glider will feel more solid and secure. If you happen to dump water you’ll be surprised at the difference in feel, how light, jumpy and twitchy an empty glider feels in comparison to what feels like when full.
Remember that stall speed increases with wing loading – the whole polar curve shifts right. If your best L/D glide ratio occurs at 50 knots empty, you’ll need to be flying at minimum 60-65kts to prevent the glider mushing. Whereas you may find that an empty glider goes up best at around 50-52kts, the same glider will require up around 60kts to climb. If you’re heavy, enjoy the extra speed.
Aerobatics
Gliders may be approved to do simple aerobatics when not full of water, but most are not approved to do so when water ballasted. “Intentional spins with water ballast are not permitted.” Read your flight manual!
When to Dump Water?
The essential thing to remember is that it is all a question of trading off the higher inter-thermal speeds against the lower climb rates in thermals. If the thermals are strong, what you lose in climb rate is relatively insignificant. But if it’s a weak day, then the difference in sink rate can mean the difference between climbing and not. Consider a hypothetical case – assume that when thermalling empty, the glider sink rate is 2kts, versus 2½kts sink rate for a ballasted glider – a ½ knot difference.
If you find a thermal where the air is going up at 3kts, the empty glider will climb at 1 knot, while the ballasted glider will barely climb, achieving just ½ knot – half the rate of climb! It’s a very severe penalty, as you take twice as long to climb. Instead of, say, 25% of total flight time spent climbing, you’d be spending 50% of your time climbing. You should dump your water. The penalty is probably even bigger than this, as the heavier glider needs to fly faster to avoid stalling, or mushing, so it can’t stay as close to the stronger lift in the centre of the thermal.
If you’re climbing at average 4kts, the penalty of ½ knot is 13% and still significant. But if you find thermals of 6-8kts, the penalty is less than 10%. You’ll be spending less than 25% of your time climbing, and the higher inter-thermal cruising speeds you can achieve with ballast more than offsets this climbing penalty.
In Australia in summer we’re blessed with strong conditions, and very rarely do you take off without full water ballast. In comps, it’s always an advantage to stay full, at least until you reach the first thermal on track. If it’s a very weak day, you can dump down then – you’ve had the benefit of the flatter first glide to that thermal.
Some recommendations I’ve seen for older gliders suggest that ballast is not worthwhile unless conditions exceed 4kts for the day. I think most of us tend to hang on to our water far too long. The decision to dump or reduce loading depends a lot on your view about how conditions will develop, and also how well your glider climbs when heavy. My Mosquito never seemed to climb very well with a wing loading much above 43 Kg/m2 whereas the modern wing profiles seem to still climb well in weak conditions fully loaded (over 50 Kg/m2 ).
In Europe, I’m told the calculation of how much water to carry is a very precise art, as the weaker conditions make wing loading critical. While on the ground, you should check the rate of water flow, remembering that in-air, the flow rate could differ. In straight flight, the air pressure under the wings is higher than above, and flow is probably slower, while in a steeply banked thermal with extra G forces, the glider probably sheds water quicker. Typically, tanks will empty in around 4 to 5 minutes – some dump much faster than this. If you’re having trouble climbing, try dumping half your water – maybe a minute with taps open – and see how it feels before getting rid of it all.
Normally, the tail tank empties at a rate that keeps the glider in balance, but make sure the tail tank dump valve is open at the same time as the wing valves. And remember thermalling etiquette – don’t dump on top of other gliders thermalling below. You also need to remember to dump before landing – I normally open the taps on final glide at around 15km from home.
Landing with Water
Most manufacturers don’t recommend landing with full water – but if you need to, remember extra speed, at least another 10 knots over normal approach speed, and a gentle round-out. Flaring the glider at normal approach speed with a heavy glider can give a nasty surprise – the glider doesn’t respond to the flare the same way and you may have a heavy landing. You must have the extra speed so that the glider will respond to your flare, and the stall speed is around 10 knots higher, so touchdown will be correspondingly higher, and much harder on the undercarriage.
Problems Dumping Water
If you suspect that the water ballast isn’t dumping symmetrically (typically by the position of the stick at low airspeeds) you must close the dump valves of the wing tanks immediately, to avoid greater asymmetry. When flying with asymmetric water ballast you have to increase the airspeed, especially in turns, so that you can avoid a stall at all costs. A fully developed spin may not be recoverable with an asymmetric load.
Fly the normal circuit and touch down approximately 6kts faster than usual and after touch down, carefully controlling the bank angle to avoid a wing touching the ground too early. It is dangerous to fly with empty wing tanks while ballast is remaining in the fin tank because the CofG position might get dangerously more aft. Therefore, it is prohibited to put water in the fin tank if there is any risk of icing.
If the operating force of the fin ballast control handle is unusually low and you you don’t feel the force of the retaining spring, you should suspect that the valve cannot be opened. In this case you should shut all the valves, wings and tail, to avoid an inadmissibly aft CofG position. If you must perform the landing with full ballast, try to avoid an outlanding – that’s verbatim from the manual!
Leaky dump valves are often a problem – drip, drip, drip. Try a bit of Vaseline around the rim of the valve seat. But be careful. Some dump valves rely on rubber to seal, and grease (to a lesser extent Vaseline) can degrade the rubber. Neoprene is more resistant to grease, and silicon grease won’t worry rubber seals. Some dump valves have a threaded centre into which you can screw a tool to pull down more firmly and improve the seal before launch. But if you partially dump water during the flight, the valves may drip in air. It just depends how significant the rate of drip is.
Uneven or Restricted Dumping of Water
In a DG- 202 I owned, the neck of the water bags could become twisted during transport in the trailer, which restricted water flow when dumping. The club’s Discus IUO at one stage also had problems with one dump valve not working properly. This meant that you ended up with a very asymmetric wing loading. Always check before launch that both wings are dumping water evenly. If you suspect they’re not in flight, add another 5-10 knots to your approach speed when landing, and prepare for a ground loop at the end of your ground roll as you lose speed. In air, it’s probably a good idea to consciously maintain a bit of extra speed, as a spin with asymmetric wing loading could be interesting.
Bags vs Integral Tanks
There are potentially some issues with integral tanks, in which the wing structure forms the tank. Composite resins and gelcoat absorb water and ultimately can deteriorate and weaken with water penetration. The inside of the tanks may be sloshed with paint or gelcoat during the manufacturing process to provide a water seal at the spar/skin joints. How well this seal withstands continual moisture is unknown. Some gliders are known to have developed leaks and water penetration into the structure. It is recommended that gliders be stored with water dump valves open to allow residual water to dry out – some people have installed small fans to aid the ventilation when hangared.
Water bags, on the other hand, contain the moisture inside a vinyl sleeve which protects the integrity of the resin structure. But bags can also develop leaks, and the vinyl deteriorates with age and may need repair or replacement. Fortunately, a number of Australian companies can supply good new water bags for a lot less than OEM bags.
The Polar Curve and Water Ballast
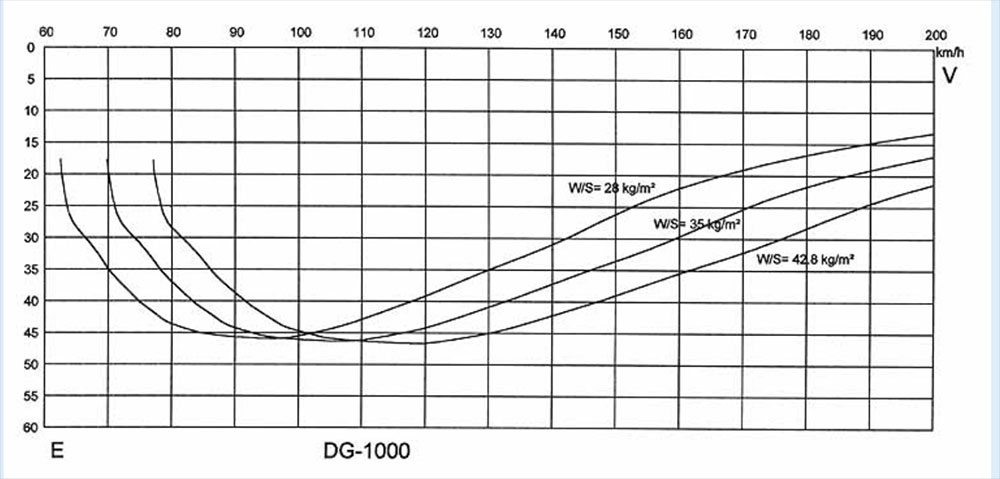
Let's look at this L/D(=E) diagram of the enticing DG-1000 from DG Flugzeugbau. (But don’t fear – it’s true for all gliders). The first graph shows L/D at various wing loadings. The best L/D ratio is equal for different wing loadings, but occurs at different speeds – the higher the load, the higher the speed. You can also see that the minimum/stall speed is also higher for higher loads.
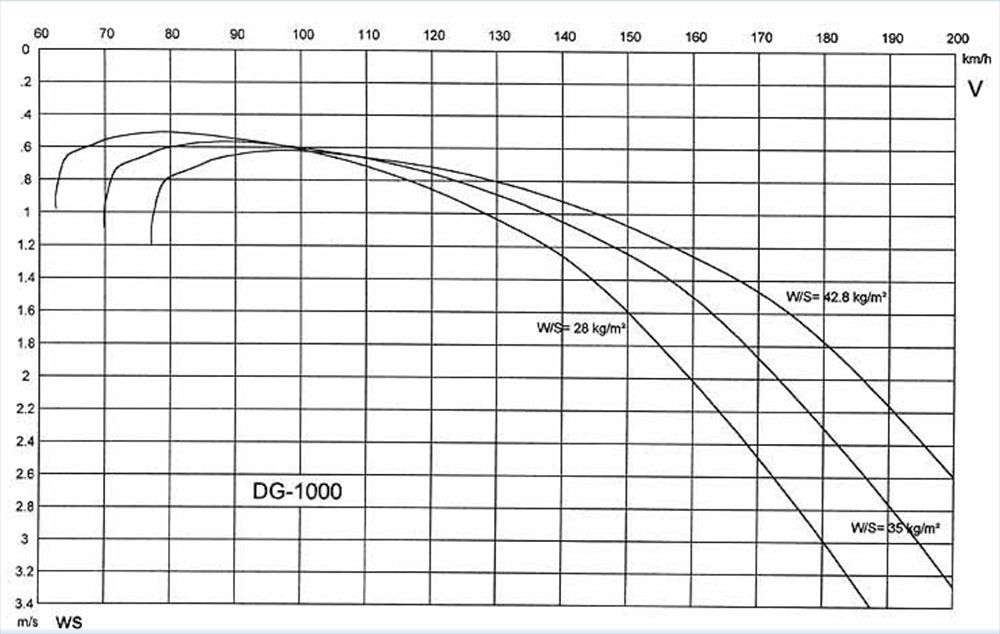
The next diagram shows the polar curve. You can see that the minimum sink rate occurs at the lightest load. The heavier the load is, the longer you will have to circle in the same thermal for a given height gain.
Higher wing loading is a trade-off between higher average speed and less efficient climbing. In case of strong thermals and/or long glide intervals, the optimum moves toward more, in weak conditions towards less or no ballast.
The good thing is that you can dump water rather quickly (also partially), so that in a competition you usually tend to fill up (and dump in case) rather than start light (the Quintus for example can take up to 250 litres!) Aft ballast in the vertical tailplane is sometimes used to balance a forward CG caused by water in the wings – depending on your ship, partial dumping can be problematic. Of course, there are many philosophies and tactical debates concerning the ‘water or no water’ dispute, but once you've overtaken an identical, lighter ship with full wings and no height loss, you understand how fun ballast can be – until the next thermal, that is.
Cheap water flow meters can be quite reliable provided the battery is not going flat, and the flow rate is sufficient. I keep two meters “in-line” to check on each other, and regularly check the flow calibration into a calibrated bucket. (Min flow 6litres/min for the Hoselink to register properly. Keep a spare battery and change at least annually or once a year.